
Last Updated on June 17, 2023 by Art
A Klimt Image Appears from a Random Pile of Parts!
This Jigsaw Puzzle Assembly blog is the third and last of a series. The first one gave an overview of all modern jigsaw puzzles. The second one described the personalities of the puzzles from different puzzle makers. Today’s essay is a photo journey through the entire process of working a high-quality puzzle made by Liberty Puzzles.
Warning: there’s so much detail that today’s blog is pretty long!
A Journey Through Wooden Jigsaw Puzzle Assembly
Let’s take a trip together, shall we?
I thought you might enjoy vicariously working one puzzle with me. This jigsaw puzzle assembly reveals ways to approach a puzzle, and some of the unexpected joys that appear on the journey.
As noted, Nola’s and my personal collection leans heavily toward Liberty and Wentworth. Of these, we have a more personal relationship with Liberty, since we visited there and since we have made a long-distance friend of Ethan in their Customer Service. In addition, a Liberty puzzle is often more fun to work. Hence today’s choice is a Liberty Puzzle.
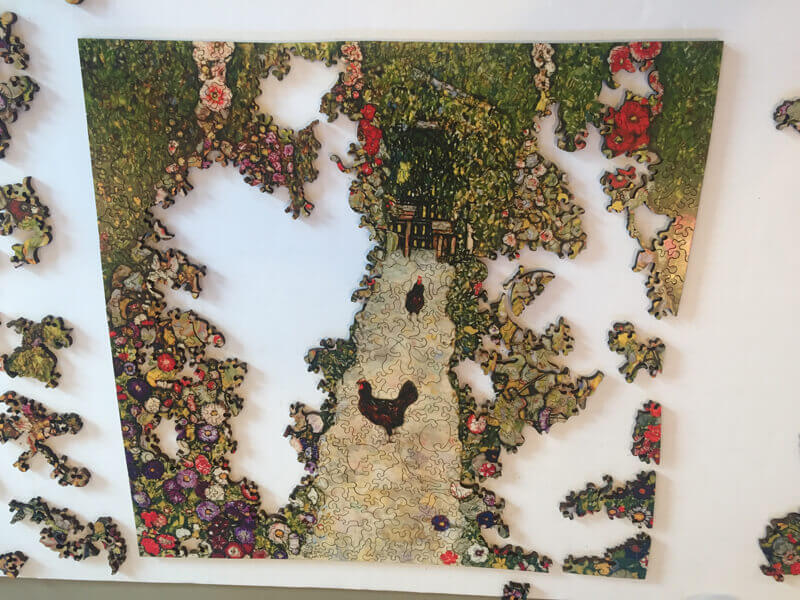
The Chosen Puzzle: Klimt, Garden Path with Chickens
 The puzzle I chose for your enjoyment reproduces Gustav Klimt’s Garden Path with Chickens. I don’t know about you, but when I think of Klimt I think of lushly dressed women and couples, not barnyard scenes. Nevertheless, this puzzle is true Klimt, and he has transformed his ornate costumes into densely clustered flowers! It’s a medium-size puzzle, with 495 pieces.
 Here are our tools for jigsaw puzzle assembly: a 20″ by 30″ foam core board and a half-dozen sorting trays. (For a puzzle with lots more pieces we would use a 30″ by 40″ board.)
Confronting the Mess
 Inside the box is a tangled mess of pieces. The colors are all confused but we can spot tantalizing figure cutouts, including the trademarked eagle cut into every Liberty puzzle.
Note: Click on any image to enlarge it!
Two or Three Sorting Trays for Whimsies
 In jigsaw puzzle assembly of this particular puzzle we have an image on the box. That helps us decide how to sort the pieces into the sorting trays. In a Liberty puzzle the whimsies are a real treat, whether they represent people, things or abstract designs. We like to put those into a few trays of their own so we can enjoy them, and so we can build around them. Naturally, we put pieces face up so that we can enjoy the colors and patterns, and to assist our assembly.
Sometimes we put whimsies in just one tray. However, if there are many whimsies, we may put the pure figures into one tray and geometric patterns into another tray.
[What if we were to attempt jigsaw puzzle assembly with no whimsies, or very few of them? Then we would sort by related colors, or by shapes (looking for larger or smaller connectors, or for similar arc-shaped boundaries). And here’s another trick for you: some (but not all) puzzles have a wood grain visible on the back side; when there are many similar pieces, that can help you orient them correctly.]
Whimsy-Adjacents
As you separate out the whimsies, study them. You will see clues to the pieces that adjoin them. For example, if a figure has a skinny gap between their legs, that may be filled by a long skinny piece of the right shape. Another whimsy may have a curved boundary, or a jagged boundary, or a hook-shaped edge cut. Thus the whimsies themselves tell you what features might identify a piece as adjacent to a whimsy. This allows us to put the likely whimsy-adjacent pieces into a tray of their own.
 In this puzzle the image is so complicated that it’s difficult to appreciate the design details in the whimsies. So it’s worth a peek at the back side, where we can see the exact outline of the cut. There are people doing things or in motion. We see a caterpillar-like design, perhaps something that a hen might eat. There’s a chicken of course. Also, what may be a stylized sheaf of grain, which might signify more chicken feed. There’s the Liberty eagle of course. And down the middle are some mysterious shapes which, after we assemble them, will turn out to be parts of a garden tractor.
Another Sorting Tray for Apparent Edges
The image on the box shows the puzzle as having straight edges. Sometimes the puzzle will turn out to be not quite as the box image shows, but when we examine this puzzle’s pieces we see a lot of them with exactly straight edges. Therefore another useful sorting category will be straight-edge pieces. Some of these will not be edges, they may be straight edges purposely buried in the puzzle to fool us. However, many or most of them will belong on the edge of the puzzle.
Edge Piece “Helpers”
It’s worth noting that in jigsaw puzzle assembly of a well-designed puzzle, some edge pieces will not join directly to another edge piece. Instead, they use a joiner or “helper” piece that links to both of them.
 This image shows two such edge pieces with their helper. Puzzle cutters often create edge helpers to make assembling the edge more “puzzling.” Therefore, when we are sorting the pieces, we will watch out for pieces with a point that look as if they might be edge joiners. When we spot these, we put them into the sorting tray along with the straight-sided possible edge pieces.
 Every puzzle is different in this regard. Some puzzles have few or no edge pieces that do not connect. Some puzzles use “helpers” for almost every adjacent pair of edge pieces. This particular puzzle has a mix of both. This picture shows one corner of the finished puzzle, an area that uses many helpers. Note also the clever way that a corner is formed from two otherwise ordinary-looking edge pieces.
A Sorting Tray for the Path
There’s another useful step in jigsaw puzzle assembly involving color or texture. Look at the image again. In some puzzles there may be large areas of a similar color and it may be worth assigning a color to a sorting tray. However, in this puzzle the flower sections have many colors and shapes crammed together, with no large patches of one color. The only prominent areas with something like a solid color are the green hedges and the off-white path with the chickens. There’s less white than green, and it’s compactly gathered. Therefore, for this particular puzzle we will pick out all pieces that have the path’s sort-of white color and put those into a tray of their own.
 This photo shows the path pieces, gathered in a tray. Some whimsies and white edge pieces have been pulled out for the purpose of building up clusters of pieces.
In addition to the trays already identified, there will be one or two sorting trays (and perhaps the bottom of the puzzle box) to collect pieces that don’t fit any of the special categories we defined. These are the “miscellaneous” trays.
When performing jigsaw puzzle assembly, we would ideally like each tray to have at most only 2 or 3 layers of pieces. When there are too many layers stacked up it’s not efficient to look through them to find a particular desired piece. Therefore, when we work larger puzzles (750 and more pieces) Nola and I often use the table itself to hold one or two additional sort categories.
Assembling the Edges
 Now that all the pieces have been sorted, we have subdivided the confusing puzzle into half a dozen sections, each of which is still pretty confusing. Since Nola and I work puzzles together, at this point one of us, most often Nola, works on assembling the edges. This photo shows sections of edge already going together.
Assembling the Path
 The path is such a distinctive solid block of image that for this particular puzzle, putting the path together looks like a good early move. And within the white pieces, it’s easy to pick pieces that contain part of a black chicken. With those pieces in hand you can use the chickens as a nucleation point around which to build.
 Once you place the white pieces into place, most of the path is finished. But there’s a lot more puzzle to do.
Cluster Building
In some puzzles, there will be patches of a distinctive color and it makes sense to build those patches into clusters of pieces. However, this puzzle has such variegated colors that it’s better to build around the whimsies, being guided mostly by shape and only secondarily by color.
 Here’s an example of how that works. This is a scene of interacting whimsies, consisting of a rooster sitting on a fence. But the colors are so confusing that once it’s put together it’s hard to see the whimsy figures.
 Here I have flipped this cluster over to show its back side. Now the whimsies and the surrounding pieces are much easier to see. We only work puzzles from the front side, I’m just turning it over to help you see what was in the previous photo. With good lighting, it’s easy enough to see the whimsies from the front side even when the image is confusing like this one.
I like to build on multiple clusters at the same time. It’s an efficient approach because when I am looking for a piece to fit one cluster, I will often spot pieces that belong on other clusters. The brain can multi-task by keeping several searches in mind at once.
Spotting Shapes to Build a Cluster
 To help train your eye, here are the pieces making up that cluster, as they looked before assembly. Each of those pieces has something unusual about it that revealed that it would join to some kind of whimsy. For example, several pieces have what resemble straight edges, but upon examination the straight sides turn out to be slightly curved – therefore they are not edges. Several pieces have short zigzags that don’t resemble anything else in the puzzle. And there are longer zigzags that match to the rooster’s feathers. Spotting pieces like this gives you a chance to mate them with the chicken and its fence.
 Here I have brought the pieces closer together. If you study them you can see exactly how each outlying piece will connect to the chicken and its fence.
Gathering Distinctive Shapes
 As I was sorting through the white pieces, I saw some of them with distinctive-looking curls or sockets for curls.
 That was a clue to pull out those pieces, because they probably belonged together. And sure enough, when I found more of them I put them together to make a four-part sunburst whimsy plus pieces connecting to its perimeter.
 Sometimes whimsies go together in a much simpler manner. Here is the front side of two interacting whimsies, an adult holding the hand of a young girl. Two unusual-looking pieces form the link that binds the two figures together.
Gathering the Clusters
 There are so many whimsies in this puzzle that there are many chances to build clusters around them. This photo shows the path, surrounded by clusters built around individual whimsies.
Positioning the Clusters in the Puzzle
 Even though the colors and shapes are complicated, when a cluster gets big enough you can find it in the box cover image. That allows you to place the cluster approximately where it belongs in the total picture. And once several of the large clusters are in position, you will find that the edge of one has a shape that just fits the edge of the adjoining cluster. Thus you are able to start connecting the clusters together, as has been done here.
During this part of the assembly, we also started placing the all-green pieces. This gave us a chance to hone our color vision, because there are differences in the green from one part of the puzzle to another. Some areas have a darker tone, some are yellower, some have different textures, some have dots of other colors inserted. So if we are looking for pieces for, say, the upper left corner of the puzzle, we would look in the miscellaneous trays for green pieces of a darker color with the right texture.
 This image shows the puzzle with all of the whimsy clusters in the correct places. As you see, each of them has found a connection with the rest of the puzzle, though in some cases the connection is tenuous.
Puzzle Complete, Front Side

Once all the whimsy clusters were in position, we finished the puzzle quickly.
How might this jigsaw puzzle assembly differ if we had selected some other puzzle? One of the great things about wooden jigsaw puzzles is that every puzzle is unique, just as every puzzler is unique. The next section describes some situations that one might encounter.
Comparison with Other Puzzles
- Some puzzlers prefer the challenge of working without an image. And when you buy some puzzles, the maker doesn’t show you an image in advance. The Artifact puzzle I previously showed is such a puzzle. When you work a puzzle with no image, you have to look for colors and textures that appear related, and find shapes that will fit together.
- Some puzzlers think that it’s too easy to build around whimsies as with the puzzle above. And some puzzles contain very few whimsies so that’s not a useful strategy. No problem! If the puzzle seems too easy, try a larger puzzle the next time. And if whimsy building is not useful, use colors, textures or shapes to sort pieces and build clusters. For example, the Tyntesfield puzzle I previously showed from Wentworth has distinctive architectural textures that identify pieces that will fit together.
- I personally am not interested in trick puzzles containing exactly identical pieces. I want unique pieces so there’s extra joy in finding the ones that exactly fit. But I don’t mind pieces that are very very similar, such as the detail I showed in the edge of Liberty’s Centenario puzzle. Such puzzles are difficult to solve, but rewarding as well.
- Two-sided puzzles also don’t attract me: I want to see and appreciate “everything” and not have half of it concealed.
- Some puzzles have pieces that are cut exactly, or almost exactly, along the border between two colors. We recently assembled a Liberty Puzzle with extensive color-line cutting and it was a refreshing change of pace. We found ourselves looking for tiny clues (a microscopic line of color where the cut didn’t quite match the image, or the exact curve of a butterfly wing) to fit otherwise similar background pieces around the images correctly.
Puzzle Complete, Back Side
Eventually you will be finished with looking at the completed puzzle. You’ll want to return it to the box, to make room on your table for some other activity.
But wait, don’t box that puzzle yet! First, turn it over to enjoy the puzzle cutter’s craft.
How shall we flip it? The Chris Wirth interview on YouTube shows a worker flipping a finished puzzle as if it were a flapjack, every piece remaining in place. His skill really impresses me! However, I don’t recommend this approach unless you have fabulous motor control.
Nola and I prefer a safer technique: we cover the puzzle with a second piece of foamcore board and hold the two boards together tightly at the edges while turning them both over. Removing the top board then reveals the back side of the puzzle:
 Images Within the Back Side

 There’s a lot to enjoy about the back view of a well-designed puzzle. For example, consider this detail from its center. There’s a sunburst in the center, surrounded by an egg, a baby chick, and five adult chickens. In addition, there are bugs and flying insects for the chickens to pursue, a woman chasing a huge egg, and other stuff.
What else can we find in the full puzzle view? There’s a multi-part cow at the center bottom, with a man walking away holding two pails of milk. There’s a young woman pushing a baby carriage along the left edge. In upper left center is the garden tractor, its driver apparently jumping onto the seat to operate it. At top center is a man on a bicycle with a cat riding behind him. In the lower right corner is a couple dancing with musical notes and an old-fashioned gramophone floating above their heads. And there are many other things. How many figures or designs can you discover?
Special Treat: A Visit to Liberty Puzzles
If you have read this far, you may have the appetite for a special treat. In July 2018 Nola and I visited the Liberty Puzzles factory in Boulder, Colorado. Attached HERE is a PDF of our visit, as we reported it on Facebook.
Note added March 2, 2021, updated June 17, 2023: But wait, there’s more! Liberty Puzzles has a News page with some interesting posts. A previous featured a talk that founder Chris Wirth gave to Mensa San Diego. His 30 minute talk traces the modern history of jigsaw puzzles and his own family’s connection to them; and it’s followed by 50 minutes of Q&A which is interesting in its own right. You might also enjoy seeing their Facebook page.
This completes our three-blog series on jigsaw puzzles, covering an overview of modern puzzles, detailed comparisons of some puzzle makers, and finally a journey through a jigsaw puzzle assembly. I hope this adventure has been fun for you. And if you decide to work some wooden jigsaw puzzles, I hope you enjoy them as much as our family does!
Credits: Twenty-four images by Art Chester.